Unpacking after a Road Trip

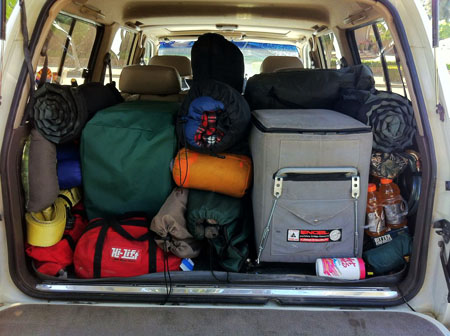
That’s a lot of gear to unload and store!
Because the Land Cruiser is also my daily driver, when I return home from a road trip I inevitably need to unload the vast amounts of crap vital equipment I’d brought with me.
It would be different if I was a “real” overlander who was on the road in his rig full-time. In that scenario, when you break camp you store everything in your vehicle until it is needed again, which is very likely the next night. There’s no transition between being on a road trip and back to the daily norm – they are one and the same.
For me, when the road trip (whether overnight or two weeks) is over and I’m home again, I need to get Toyotie unloaded and get the interior space back for other things. It also gets my valuable gear stored safely away and no longer vulnerable to quick theft. Reducing the weight in the vehicle also aids with fuel efficiency, since a heavier vehicle consumes more fuel.
So, all the gear gets unloaded. A few items that may have been unloaded for the trip are also put back inside the vehicle.
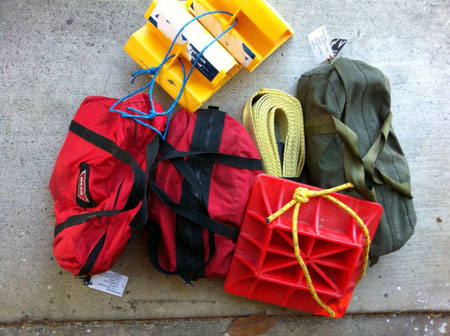
I’ve created a small photo gallery, showing a typical unpacking process. The details will vary from trip to trip, and the process (and gear) evolves over time, but the basics are the same.
What doesn’t change is the core fundamentals of this process: Each items is unloaded. It is inspected, cleaned, and repaired as required. Then it is stored away properly, wherever it belongs. This is repeated as necessary until all of the equipment has been dealt with.

After a trip, the fundamentals are the same for dealing with all gear, whether it be a sleeping bag, a coffee pot, or recovery gear as shown here.
At the same time, there are similar checks and fixes as needed for the vehicle itself, but those are beyond the scope of this post. Suffice to say that any offroad vehicle should ideally be kept in good, reliable condition.
One particularly important focus of the maintenance is the camp kitchen. That includes the fridge and any food stored within the vehicle. This is the ideal time to get all the food out, including wrappers, crumbs, etc. My vehicle sometimes operates in bear country – like Yosemite – and it’s important not to give the bears any yummy incentive to smash their way into the Land Cruiser.
At the same time, when I’m out in the field on a trip, I sometimes can’t clean things as thoroughly as I’d like. This especially applies to cookwear, dishes, and utensils, which sometimes are scrubbed quickly in sub-freezing temperatures via the light of a headlamp. When the trip is over, it’s the ideal time to take a close look at these items and get them immaculately clean and sanitary once more.
I think that summarizes my post-trip process. It sets the stage for the next trip, and knowing that my gear is clean and in good working order – and that I can find it again!
Great post Dave, this pretty much mirrors my process too, but since Hank isn’t my daily driver, I tend to leave a lot of my gear in the truck. The only things that I bring in are electronics, clothes, sleeping bags, etc.
October 24th, 2012 at 10:49 amI’ve always wanted to do a time-lapse of the packing or unpacking process. The thorough cleaning of kitchen stuff is so critical because no one wants to open up the cooking kit to find fuzz growing! Cleaning/sterilizing the water cans is also really important!
October 24th, 2012 at 11:50 amDan, a time-lapse is a great idea! Maybe I’ll try that with my GoPro sometime.
Every so often I clean and sanitize my water cans with the same products I use for my homebrewing equipment, where sanitation is crucial.
Another thing with the water cans is that if you’re going to fill them with a hose – as I do – is to use a hose that is rated for use with human consumption. That is to say, use a marine/RV-spec hose (usually white) and not your normal green garden hose. Besides keeping lead and other unwanted chemicals out of your water, you’ll also avoid that distinctive garden hose flavor.
October 24th, 2012 at 12:01 pmNice post. While my FJ is my daily driver, my life has an expedition quality to it. (Or, i imagine it does). One never knows when the chance to get a quick bike ride might appear; or the chance to scare a few trout. So at any given time, the FJ has recovery gear, a few fly rods and associated junk, er, gear; and a bike with the eleventeen pounds of stuff required for said bike.
October 24th, 2012 at 12:39 pmAnd as we spend a lot of time in the mountains, i have a “survival” bag that should have warm clothes, dry base layer stuff, gloves and hat and a space blanket or two. And water. This bag, in fact, probably holds two mismatched socks, one glove, a wool hat that is more moth-holes than wool, the package in which the space blanket arrived, but sans blanket, and a 20-year old coat that no longer fits. There is also mold from when the bottle of water froze, split open, melted and got everything wet.
Unpacking from a trip often involves discovering things lost from the previous trip. Or the previous vehicle. After our month-long trip I learned I no longer had keys to anything that locks on the truck (other than the ignition), but I had six pair of sunglasses.
Having seen a bear disembowl a Ford Explorer in order to obtain access to a tin of Altoids, it’s always disturbing to find dozens of petrified French fries under the passenger seat.
Don’t even get me started on cleaning out the Horizon.
Good info, Lou! I know what you mean about the “dated” survival bag. Mine used to be the place I stuffed things like my old fleeces that I no longer could wear because they were really worn out, our just screamed “I’m from the 1990s!” Or worse…
Living in San Jose, a survival kit should really probably be a few $20 bills, a change of clothes, rain gear and some water. I find that the clothing & water mostly gets used after a hike.
The bike is an interesting mention. My bike carrier is hitch-mounted, where it makes getting the tailgate open more involved. It’s usually on at home, but it gets removed for the road trips. If I was on the road longer & wanted the bike, I think I’d look into having a carrier of some kind added to the rear bumper carriers.
Good discussion!
October 24th, 2012 at 1:10 pmIf I lived in SoCal still, a survival kit might require a Starbucks card and a tie. 🙂
We wrestle with the bikes a lot…putting them on the roof rack is a pain, and overhead clearance becomes an issue (i.e.: Usal Rd.). We came really close to getting a hitch carrier for the trailer, and may still do so. We had some great rides in our trip, but generally dealing with the bikes was just a pain.
October 26th, 2012 at 4:46 amThe Starbucks card would be an important safety net. It’s best to not take chances with critical systems like coffee. I prefer NASA-like triple redundancy. But as to the tie… Well, sometimes you have to wonder if survival is really worth it. 😉
October 26th, 2012 at 8:21 amGood point on the hose! I usually fill mine from the sink at home using Pur filtered water. One of these days I’ll put together a post with all the kit that I keep in both mine and my wife’s trucks during the winter here. Winter in New York is no joke, as you probably know.
October 26th, 2012 at 8:52 pmI know a little about NY winters, being a native New Yorker and all… But it was a long time ago. And my coldest winter was in Taos, NM at -32ºF.
Gents, I might send around an email asking about your winter kits, bug out bags, or similar items. Might make a good post to put the info all together in one place.
October 26th, 2012 at 9:19 pm